Rationalising the 323 GTX, part 2: the air filter

This was my air filter.

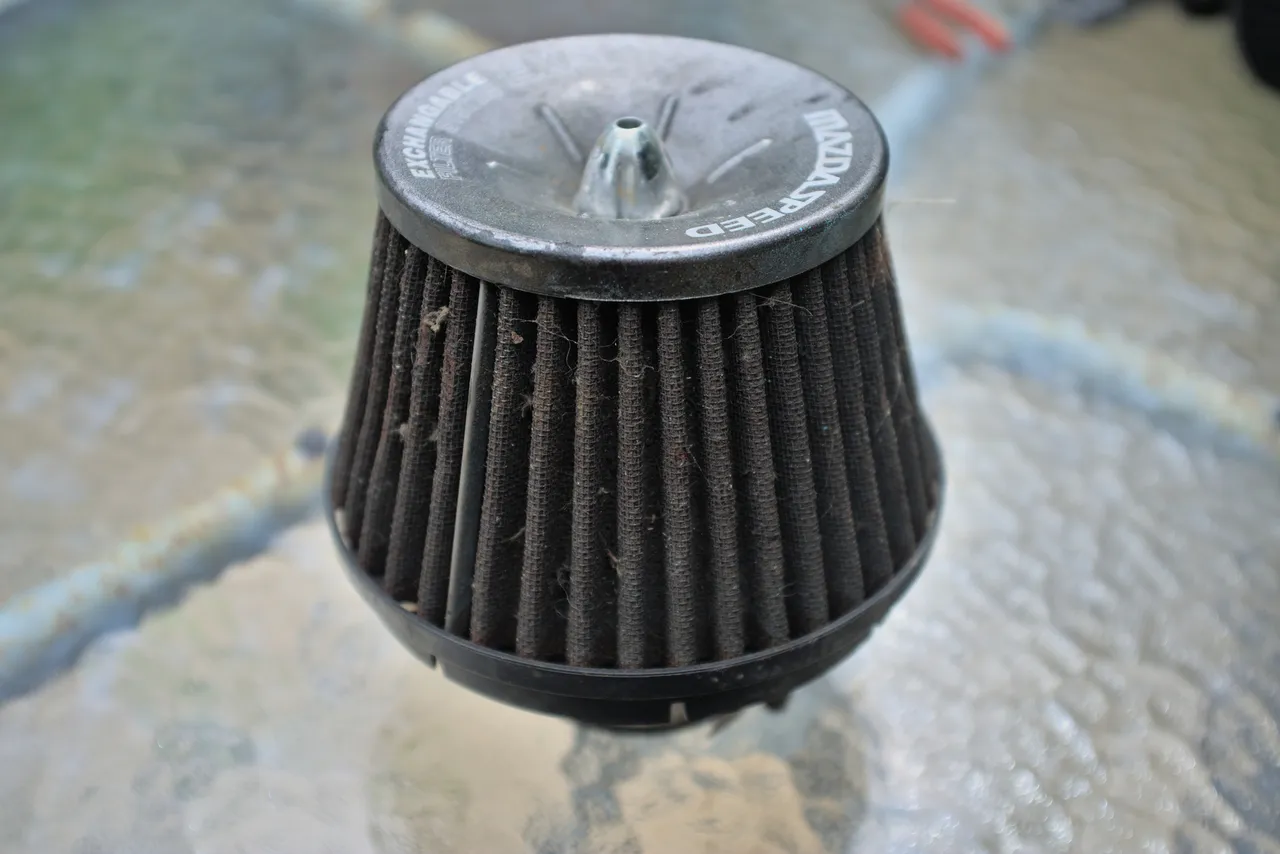
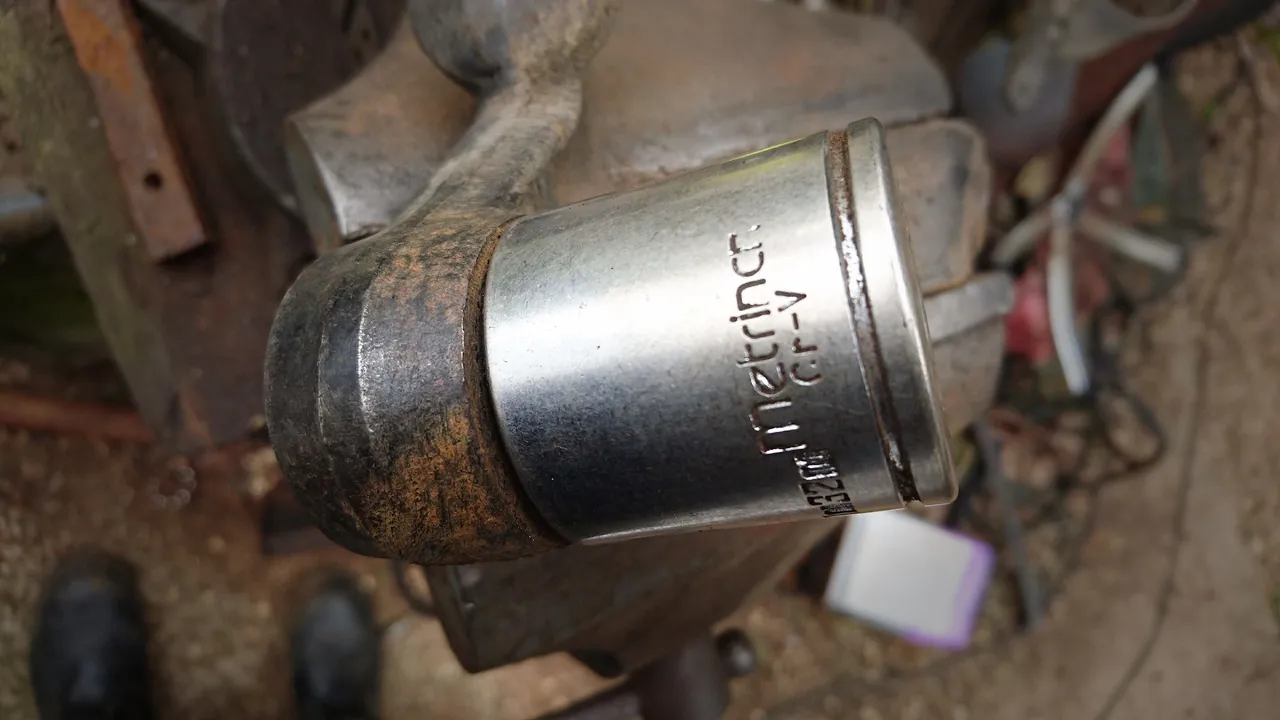
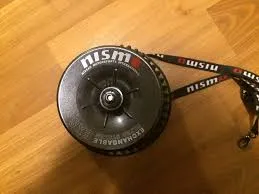
It has "Mazdaspeed" written on it. This would be kind of cool, but Mazdaspeed never made a generic 3 inch cone filter like this. There was, however, a company in the early 2000s taking generic 3 inch air filters and putting the names of manufacturers' performance divisions on them, along with fancy-sounding text like "EXS" and "EXCHANGEABLE FILTER SYSTEM". You could get one with NISMO written on it, if you wanted.

Not a Nismo air filter; it is still a generic 3-inch filter with NISMO written on it
The dialup-friendly resolution of all the pictures I could find hints at how old this filter is...

That is OK, because with a clean and an oiling this would probably remove particles from air as effectively and sound as loud as any other cone filter. It goes into the "badly modified" category I spoke of in the first part of this series because of how it was attached to the air flow meter. (Actually, it should go into the "badly modified" category because this setup sucks hot air straight from the engine bay and as such is probably less effective than the stock airbox, but I digress...)

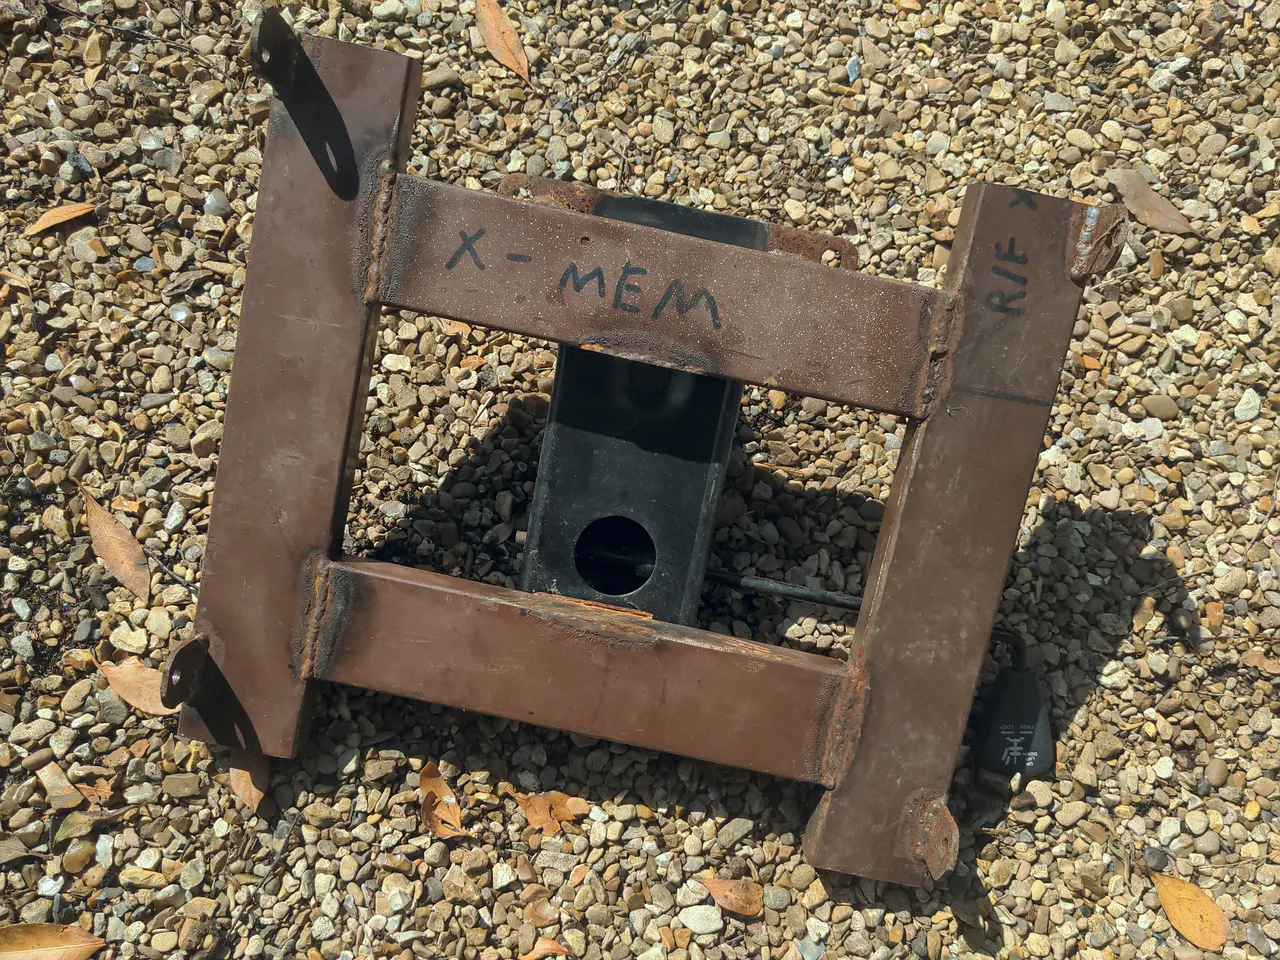
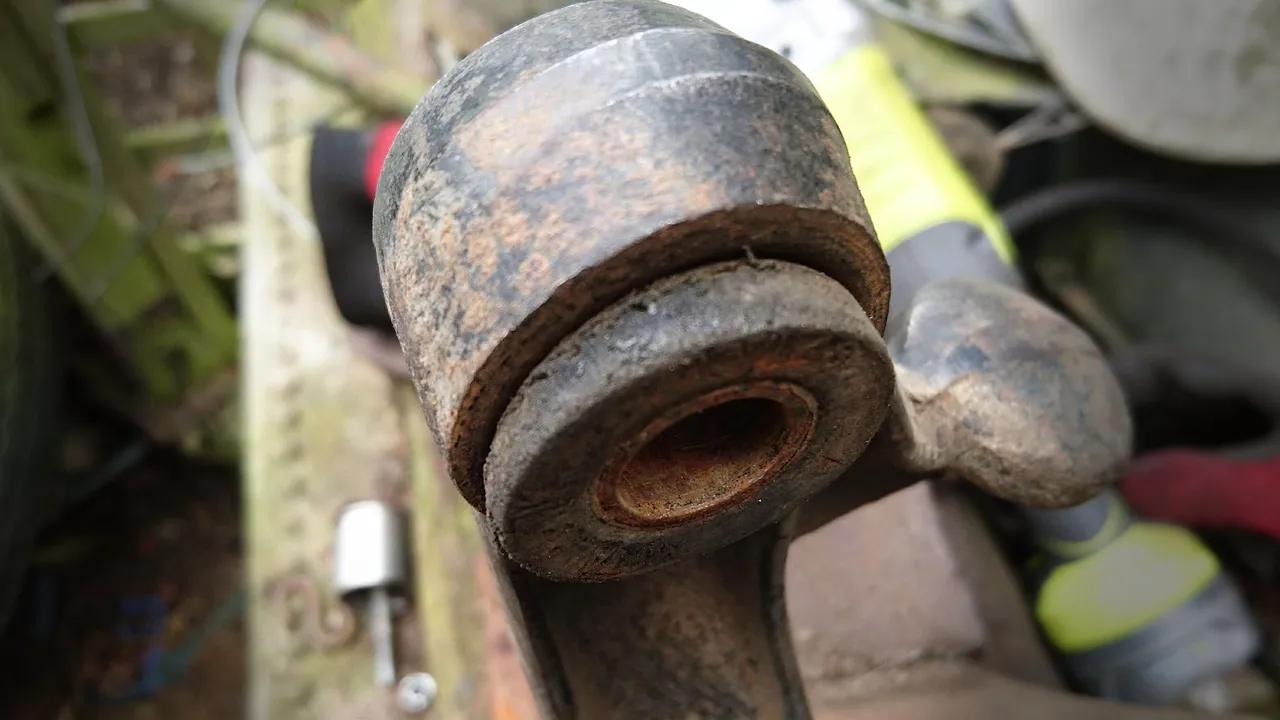
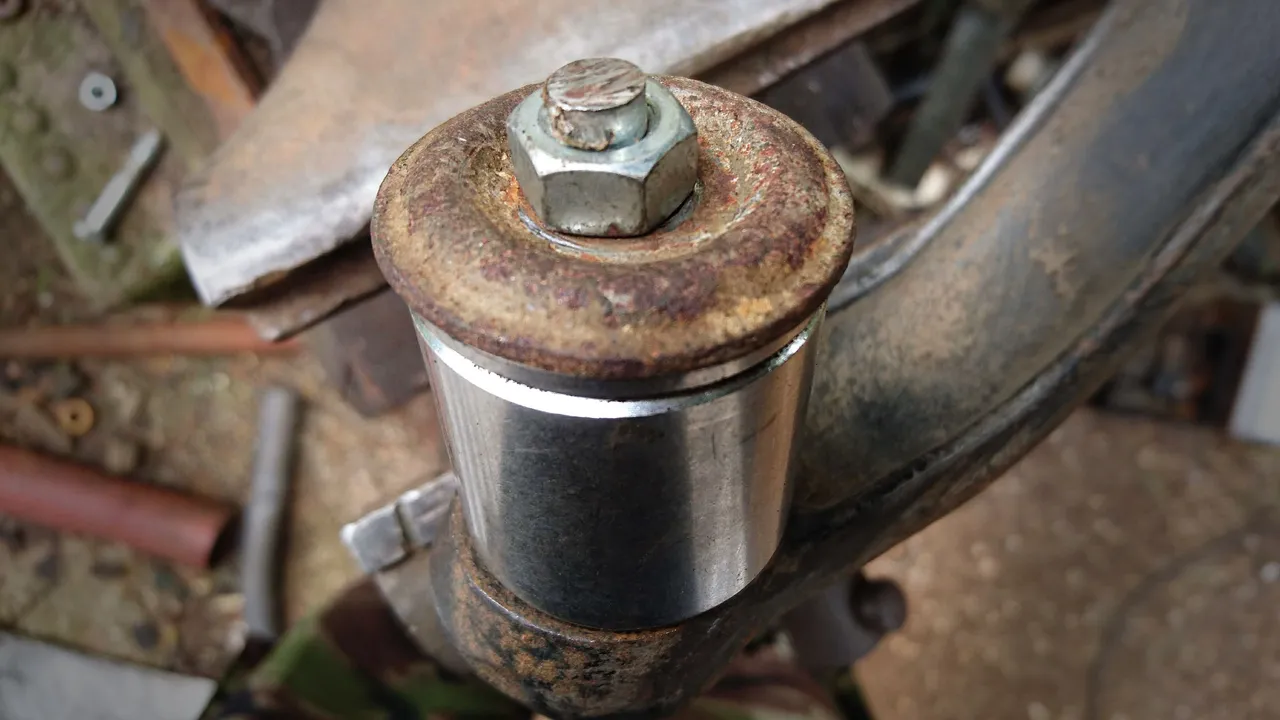
There was an adapter on the air flow meter made of two parts that didn't fit smooshed together to make something that somewhat worked:

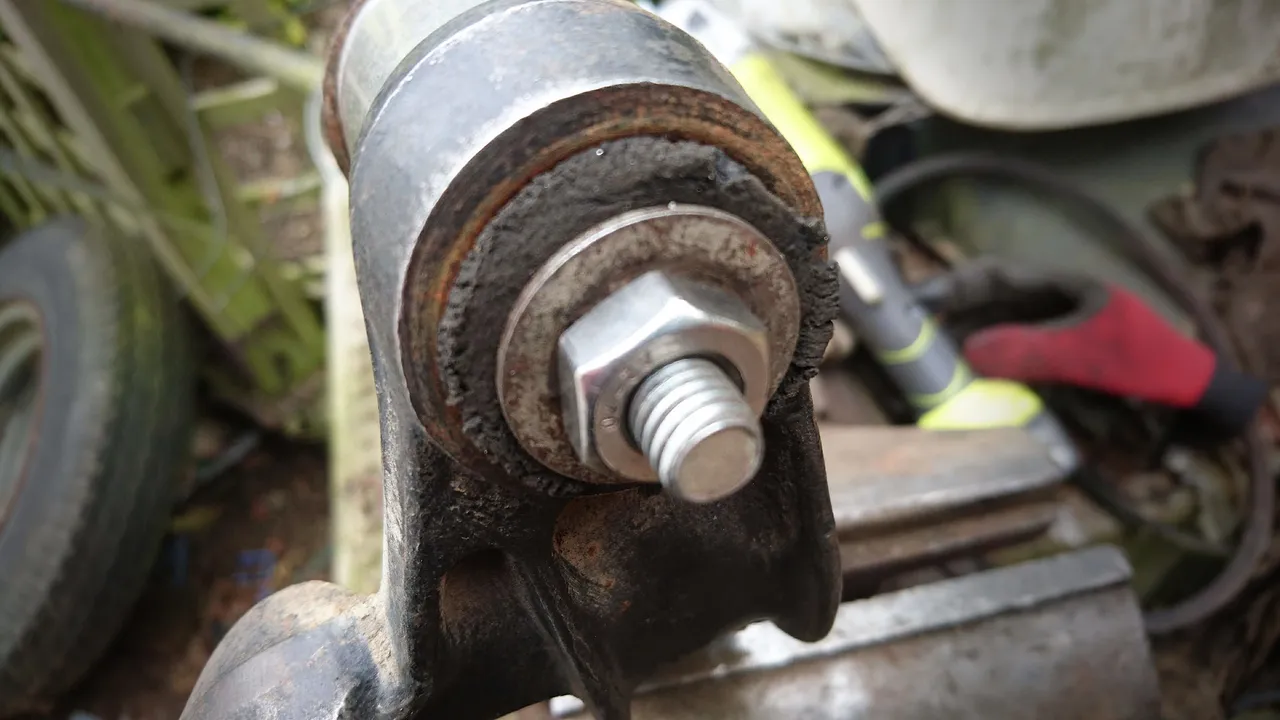
I did not like that, but worse than that, a low-quality rubber coupling hose went over the body of the air filter, attaching like this:

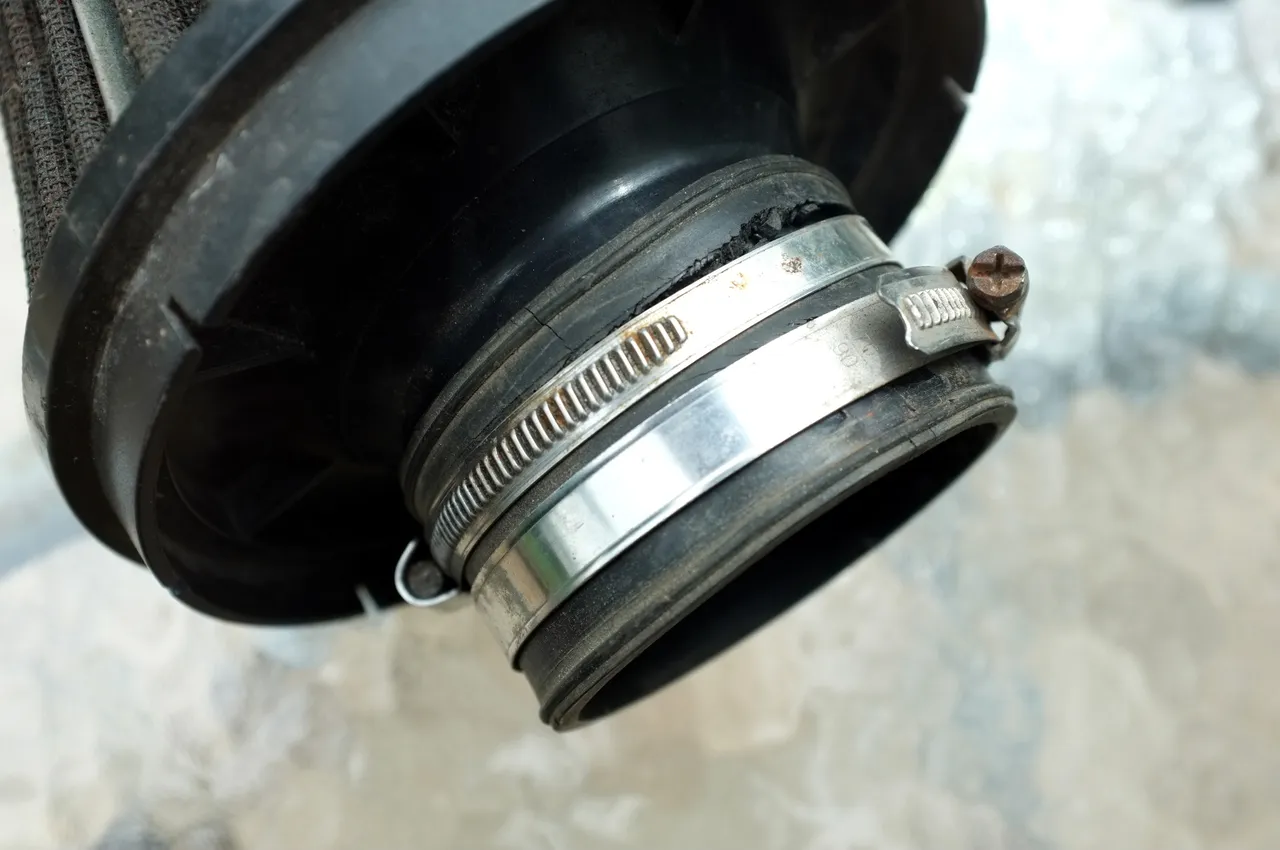
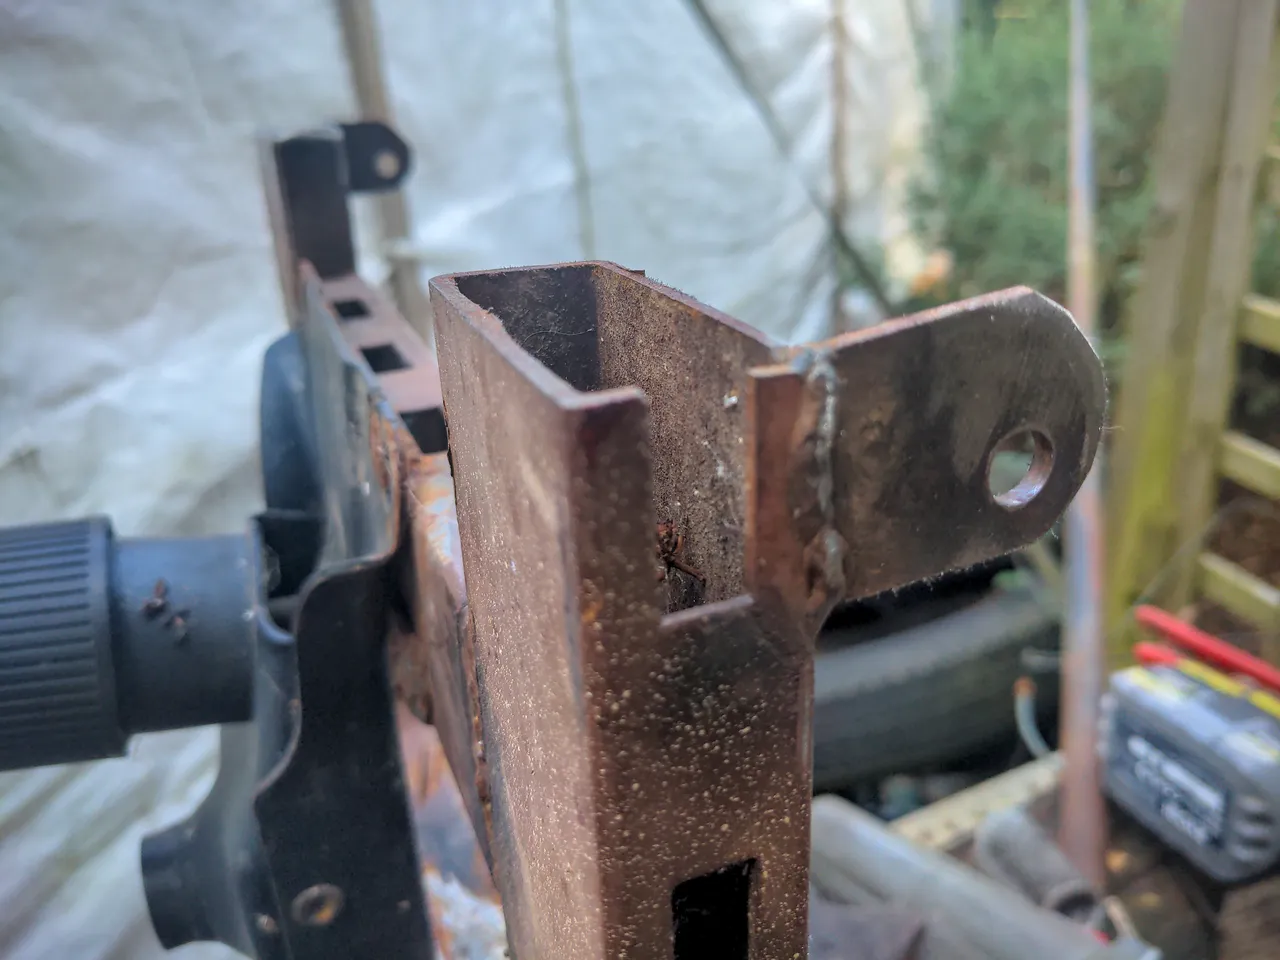
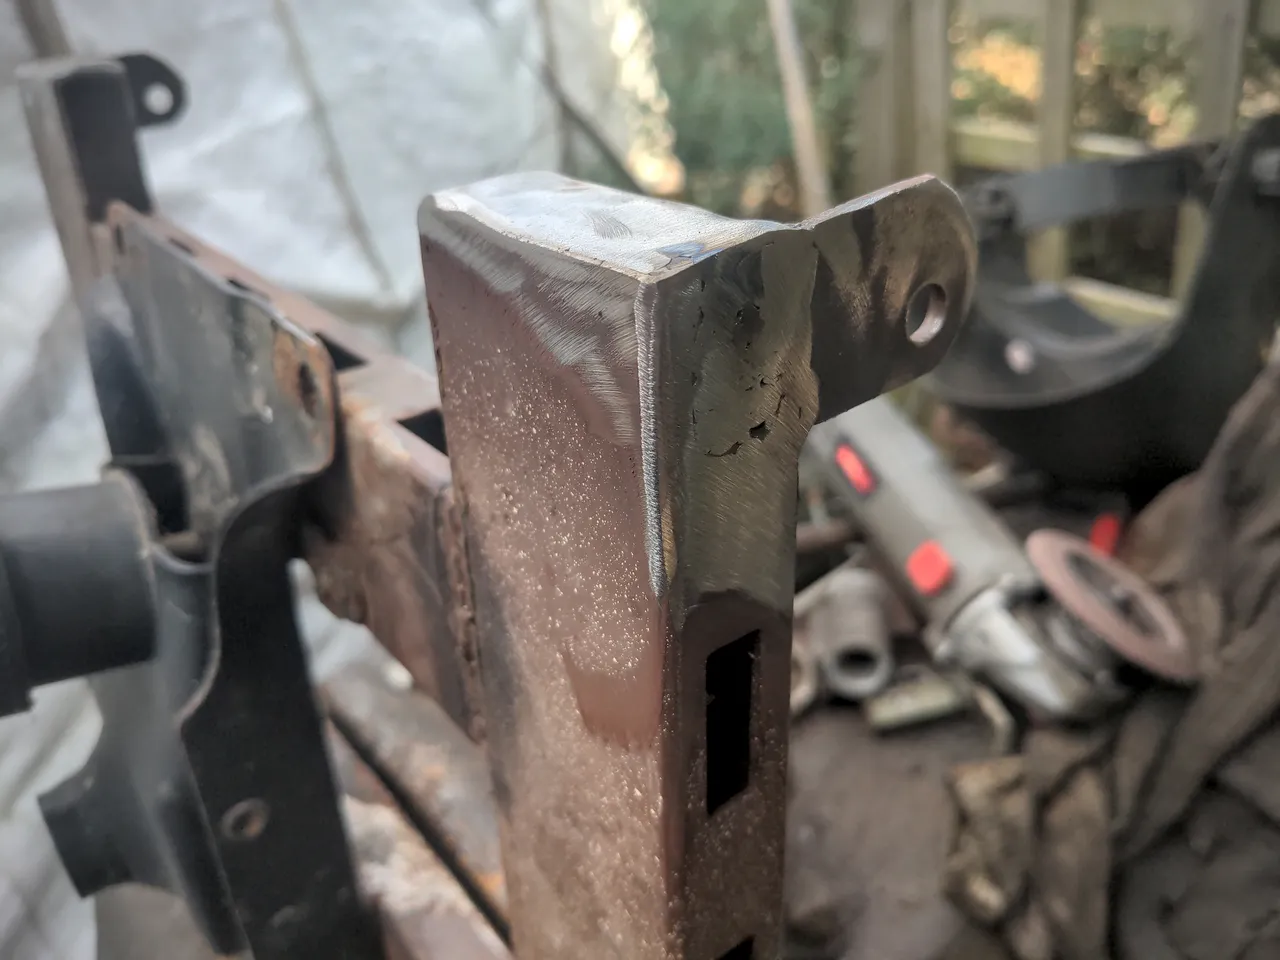
As the splitting of the rubber coupler hints (also the fact it kept falling off), this did not work very well. It was mostly through good will and fortune that it never disappeared altogether. This wouldn't do, so I set about designing a new, better, single-piece air flow meter adapter for any standard 3" air filter, spent quite a few hours on some meticulous measuring and initial CAD work...

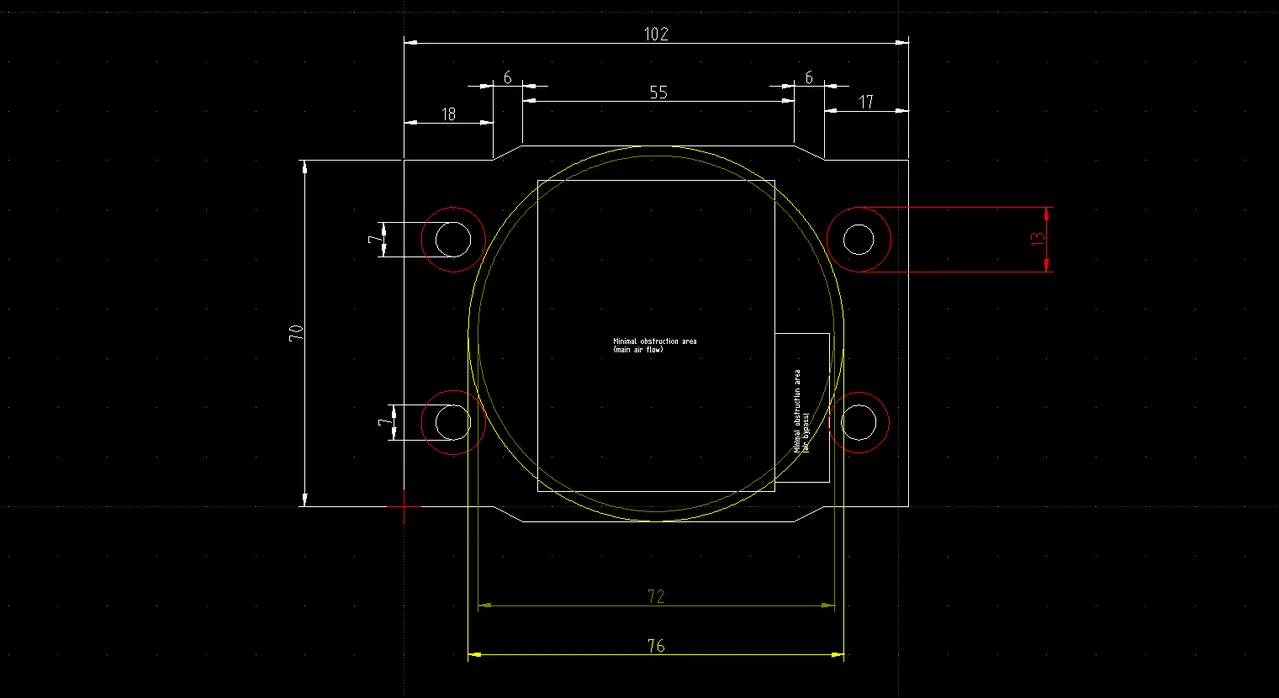
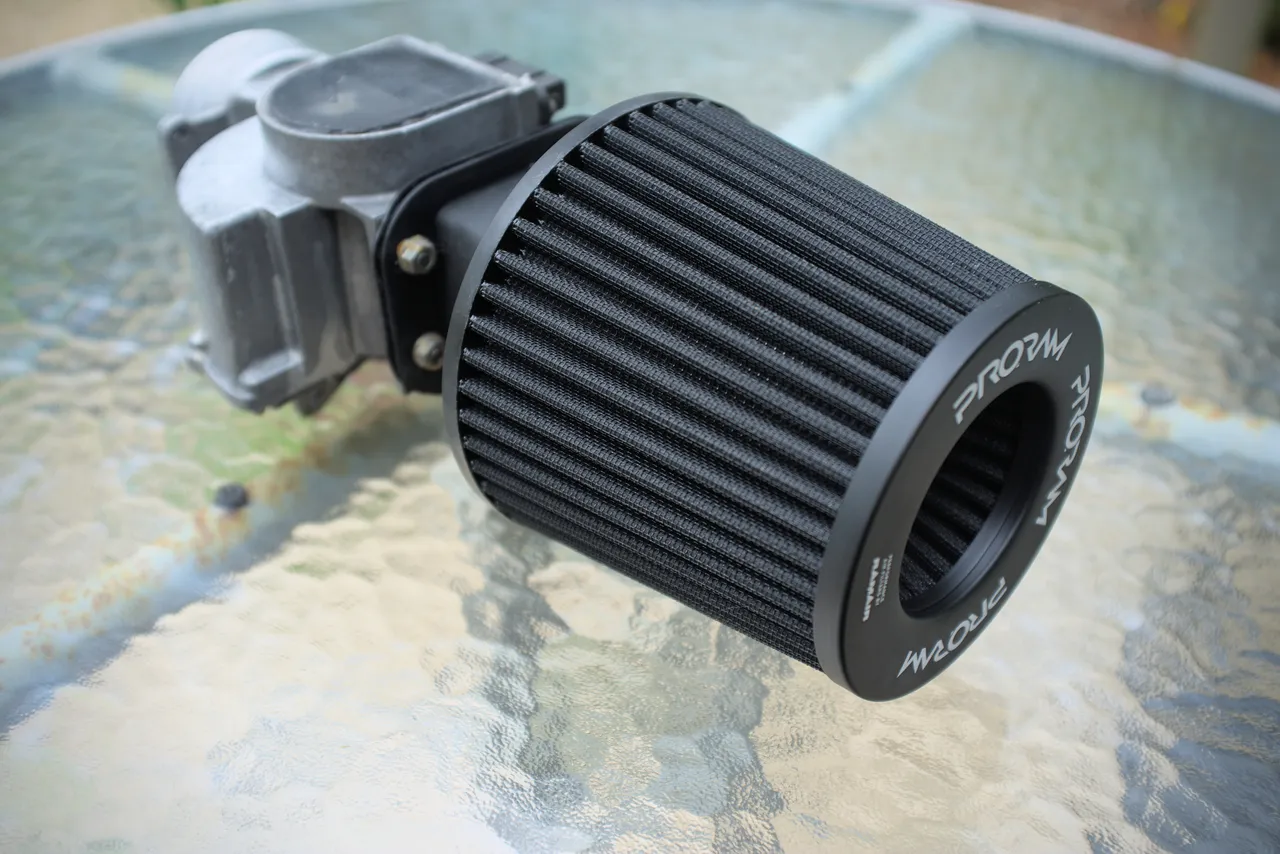
...then found out that I could buy such an adapter off the shelf for about 30 quid. So I did that instead! It was only available off-the-shelf, unlike almost everything else for this car, because the 323 GTX shares an air flow meter with the early 1.6 litre Mazda MX5s. There are trillions of those still on the road, and there is a very healthy aftermarket for them.

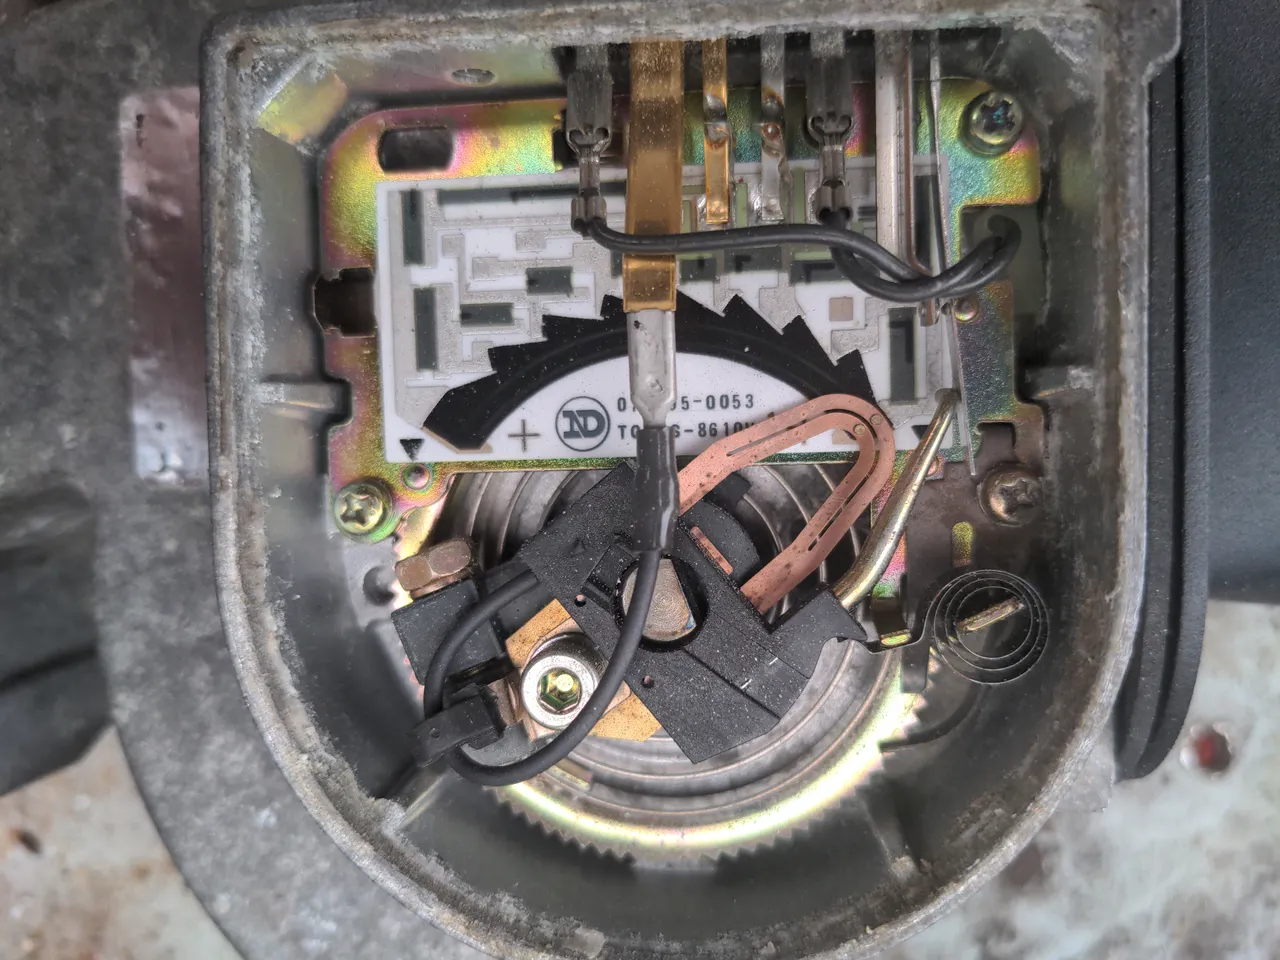
While handling the AFM, I noticed that the vane seemed stuck, which certainly wouldn't help the car run properly. After pulling off the cap, it turned out to not be the most common problem with these air flow meters. Because that was not the problem, chances were that a sharp prod would probably get the vane unstuck. It did! So I gave everything a blast of electrical contact cleaner (nectar of the gods), gave the hinge a little bit of WD-40, and it worked freely and squeak-free after that. I sealed the cap with silicone sealant this time around, because the previous person who took it apart neglected to do that.

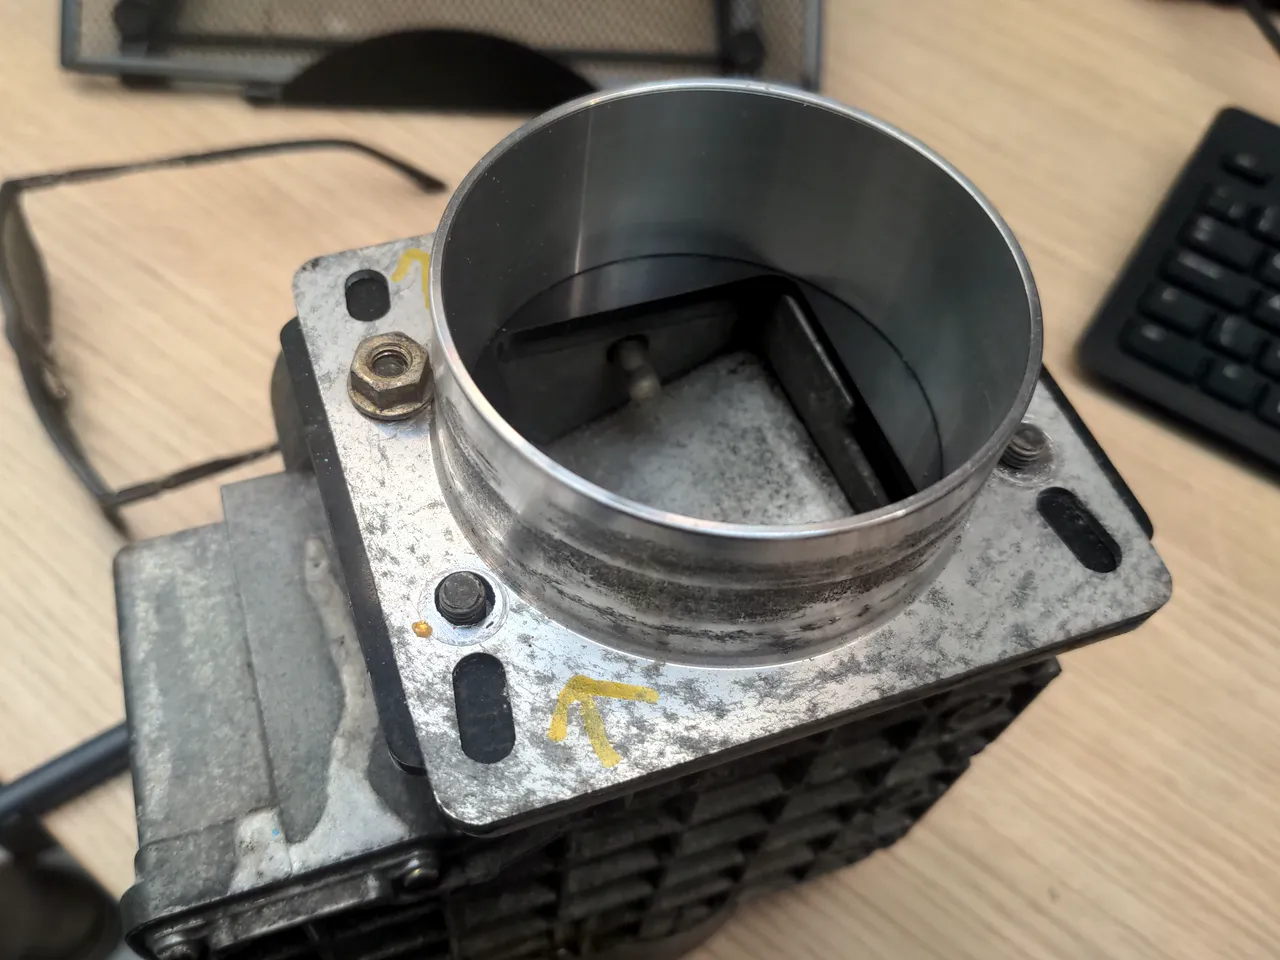
I took a photograph of the internals when I had it apart, in case anyone wondered what that looks like.

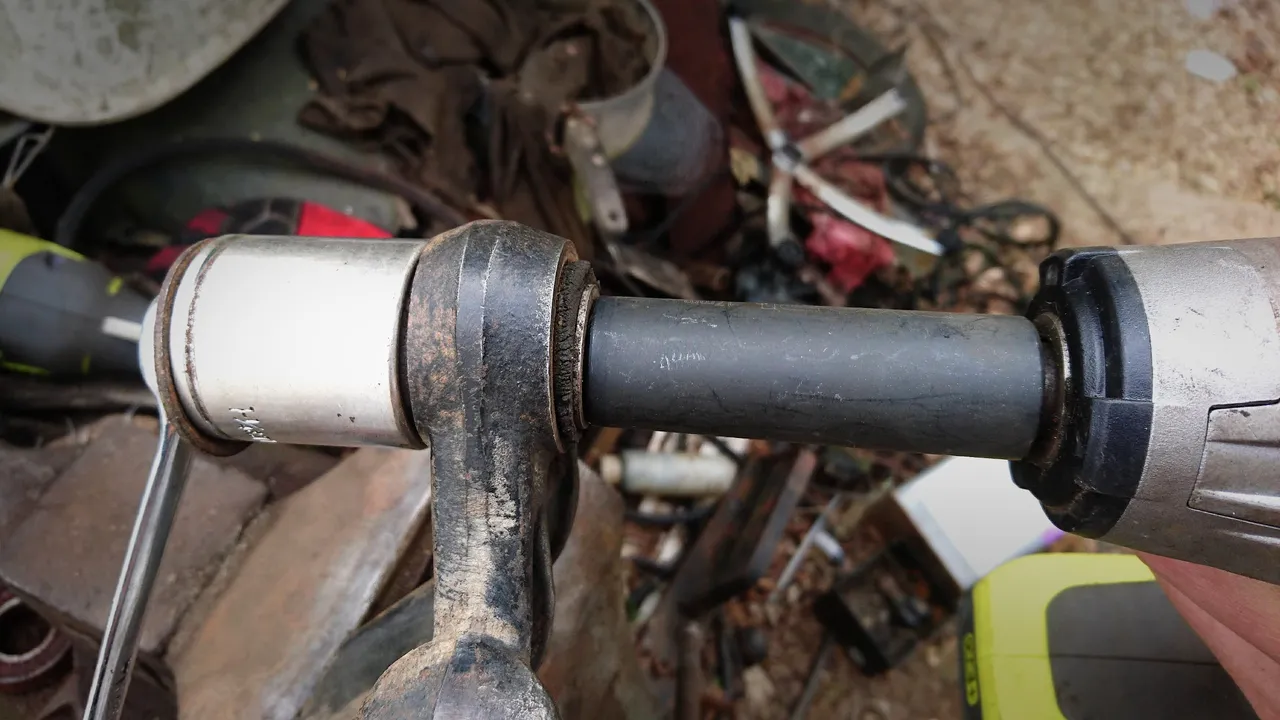
Anyway, the new adapter is much neater, because it is made of one piece of metal and any generic filter attaches to it like every other filter does.

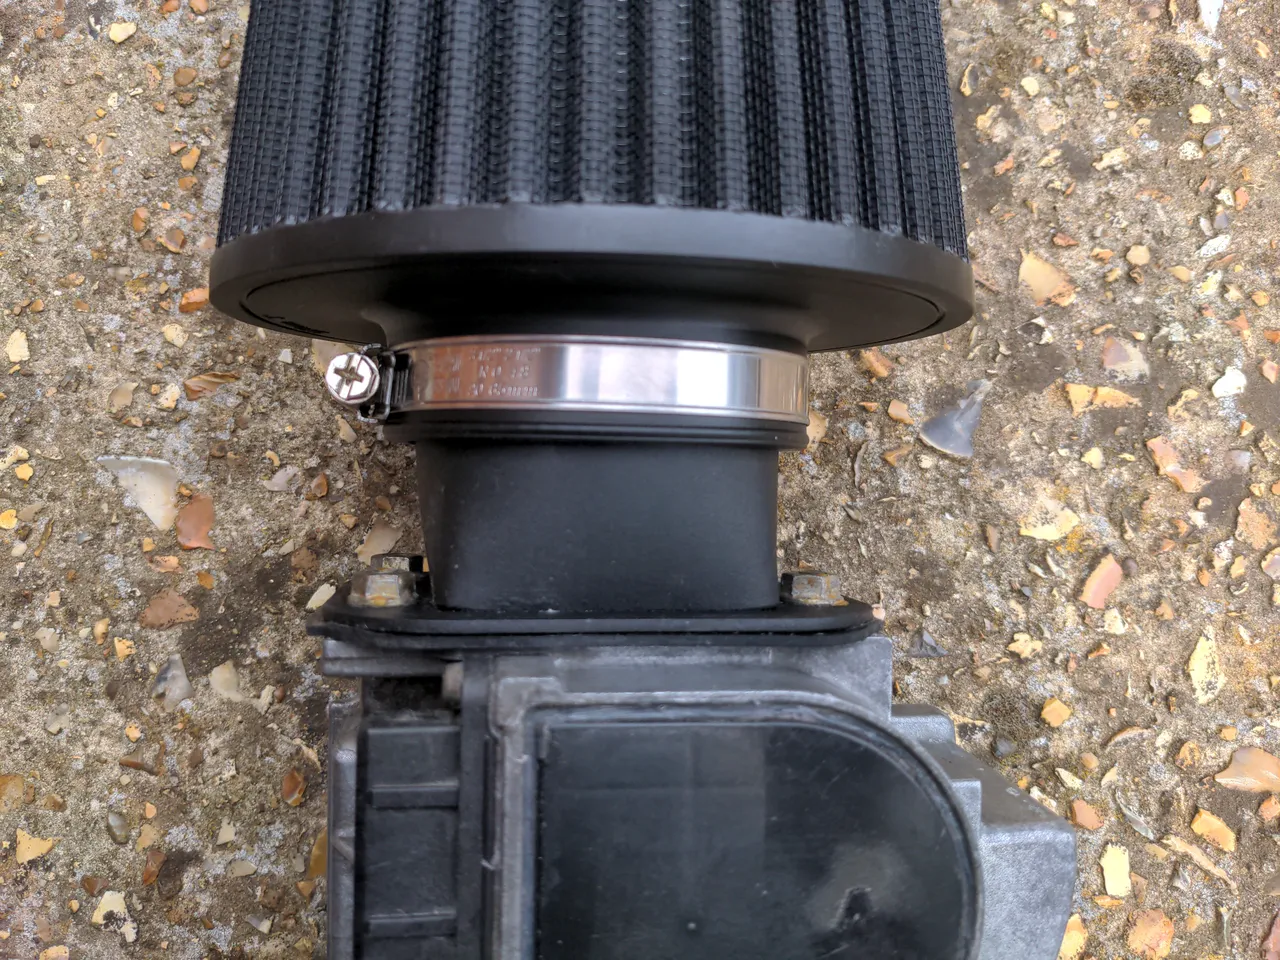
I gave the exterior of the AFM a good clean with a Brillo pad. It did not come up shiny, but it did remove some of the surface corrosion and crust. It now has a PRORAM universal 3 inch filter attached to it, because that was quite cheap, not blingy like the really cheap ones, and will work exactly as well as any other cone filter. The whole assembly looks much neater than it did.

And that, to make a short story long, is that. It was all very easy and I don't know how I got six hundred words out of that! Next up, though, things get a bit more involved...


Part numbers:

  • AFM-to-3" filter adapter: Jass Performance 5401
  • Air filter: Ramair PR-CC-150-76

Rationalising the 323 GTX, part 1: the intercooler

This is my 323 GTX's new intercooler, next to its original one. The new one is a work of art with a 60mm core made by Pro Alloy. The original one is old, weird and inefficient.

So, the Mazda 323 GTX is not dead or abandoned. I put it in warm dry storage, because if I had to look at it every day after the engine's near-death experience I probably would have stripped it and scrapped it. I intended to get back to the Mazda after the P5 was done, because I thought I would have the P5 done within a year.

The GTX came out of storage a while back, and is currently having its engine rebuilt. Someone else is doing that for me, but this has also given me the opportunity to rationalise some things around the intake side of the engine. Some of it is merely old. Some of it has been badly modified over the years, and needs re-modifying in less bad ways. I would never get around to doing all of this if i was still using the car, so maybe the engine death was an expensive blessing in disguise. I have called this "rationalisation" in the title of the post, as if there was anything rational about owning a 1980s rally car that you can't get any parts for.

One of those things is the intercooler. It is in the "merely old" category. It used to fit like this in the car:

The 323 GTX's intercooler is an old, bad design. This can be forgiven, because this was 1987, and to my dismay 1987 was 36 years ago. It likely did not do very much, but it didn't do very much just as well as anything else of its era. The bent fins that came with age and from being mishandled means it probably did even less. With my newfound desire for reliability, I wanted to replace it with something a bit better.

A recurring problem of owning old, weird, near-extinct cars is that there is a wealth of information out there, from forum posts written 15 years ago. Someone would have solved a known limitation of your car by finding a simple bolt on upgrade from a car that was common at the time and is now just as extinct as your car is. In the case of the 323 GTX, it was an easy bolt-on upgrade to its intercooler with a bigger, much better-designed one from...a first-generation Ford Probe or Mazda MX-6. Well then!

(Digressing, my favourite in that genre was trying to find seats for my mum's Suzuki SJ 410. All you needed to do was pull the seats out of a Suzuki Swift GTi! They bolt right in!)

The obvious solution would have been to go with a big front-mount intercooler. I did not relish the possibility of chopping anything up to mount one (like the unobtainable-at-any-price front bumper). Neither did I want the hassle of reworking all the pipework. I'm going to have to do some reworking of it anyway, because of a different turbo (more about this soon), but a completely different configuration is effort.

I don't know that there would be other complications I cannot foresee with an FMIC setup, because I cannot think of any. I also do not know that there will not be any complications because I cannot think of any.

What I wanted was a modern, efficient intercooler which fit in the same space as the existing one. This did not exist, until Pro Alloy made one for me.

The new intercooler is spectacular. It is a much better design, and the quality of the work is impeccable. It came with a price tag that would seem expensive, if you did not price in the fact that I was paying professionals to design something that didn't exist before and then hand-make that thing to the highest standard.

It has been designed to fit in the same space as the original intercooler, using the same mounting points. The pipes are of the same size, and come out in the same place. The height and width of the intercooler does not exceed that of the original at any point. It is somewhat thicker, but the cunning part is that this thickness has been engineered to extend into the engine side, where there is room, rather than into the front panel, where there is none.

Note the mounts have stayed in the same place relative to the front of the car!

It looks right to me; OEM, or maybe OEM+. It should give me more reliable power. It might even sound a bit nicer, too.

...or it will just act as a much more efficient engine-to-intake-air heat exchanger! We'll find out when all of this goes back together. Onwards!

Onslow's Cortina, or, cars don't age like they used to

Cars age differently these days, and by "these days" I mean "the last two and a bit decades". Cars seem to transition to "old terrible car" much more slowly, and also go through the trough of no value to "classic" much more slowly too.

What brought this to my mind, and exhibit A in my study, is Onslow's Cortina in Keeping Up Appearances.

Via the Internet Movie Car Database

The car, when it appears, is a self-contained joke. The joke is that it is a shit old car. The British audience in the early 1990s knows this, because it is a 1978 Ford Cortina. It has mismatched body panels and a missing grille because that is what is expected of a shit old car, and it backfires because it is the kind of car they would expect to backfire, because it is shit.

My mum owned one of these, of roughly the same age, around the time the second series of Keeping Up Appearances was airing. She bought it in a hurry after her Ford Capri was stolen from a car park in Ilford in 1991 (every Ford Capri was stolen from a car park in Ilford, in 1991), because it was cheap. She hated it to its core, and she gave it away because it was bad. I only have vague memories of it, but I do recall that the Honda Accord she owned after that was a revelation to all of us because it reliably started every time.

So, the Ford Cortina Mark IV. Terrible stopgap car for my mum, standalone visual gag in Keeping Up Appearances. It first appeared on screen in the second episode of Keeping Up Appearances in 1990. The car was built in 1978.

You may have been doing the sums in your head already, and know the point I am about to make by those sums multiplied by the title of the post. So here's the scary bit:

Onslow's Cortina is a mere twelve years old in Keeping Up Appearances.

Which is to say it's roughly equivalent...

Photo by M 93 on the Wikimedia Commons, CC-BY-SA 3.0

...to a 2011 Ford Mondeo today. The Mondeo looks like a modern car to me! I have a hard time imagining that its very continued existence as a car could be considered as a joke in itself. A 1993 Mondeo, maybe, with enough gaffer tape.

Maybe I just lack imagination, and maybe someone who has watched any meaningful amount of television in the last decade could prove me wrong. But I've seen far more Mondeos of any given age than I remember seeing Cortinas as a kid. Anyone reading this probably already knows that my working car is a 2004 Fiesta, which is to say, I drive a nineteen-year-old car; a car old enough to get a driving license and drive other cars. It's a running in-joke-with-myself (I am easily entertained, usually by me) to seek them out in car parks and park next to them in some sort of shit car solidarity; this is not hard to do because fifth-generation Fiestas are still absolutely everywhere.

Let's talk about classic cars, and specifically the Ford RS2000 in Lock, Stock, and Two Smoking Barrels:

The aesthetic of this film is self-consciously retro, gritty and cool - that is, what was retro, gritty and cool in 1998. The RS2000 is retro and cool in this film too - and it was a 20 year old car. Now, I don't know for a fact that a film maker would not do the same thing today with, e.g., a Ford Focus ST170...

Photo by Vauxford on Wikimedia Commons, CC-BY-SA 4.0

...but I doubt it.

The flipside of cars becoming terrible cars much slower, as I said, is that they also don't get regarded as classics quite so readily. Though looking at it through the mists of time, I disbelieve that anyone in 1995 would have choked on their Corn Flakes if it was suggested that a 1972 Mini was a classic. I have an easier time imagining a certain set of people scoffing at the notion that a 2000 Mini - you know, that one - was a classic in 2023.

Maybe I am being very selective with my samples. If so, that bias is unintentional. Or maybe, again, I am just lacking imagination. There is harder evidence that I am not lacking imagination. Recall that the road tax exemption for historic vehicles used to be a rolling 25 year one; presumably, it was because so few cars lasted to a quarter-century old that there was no point in taxing them, and those that survived deserved an exemption because they were considered classic cars.

Why do cars of the late 90s and onwards seem to have aged differently to the cars of the late 1970s and early 1980s? I have some ideas:

  • I am completely wrong. It's plausible; history could have frozen in my little head when new numbers came in, everything since 1997 is "modern" to me, this is all made up, and television programs actually do depict 2011 Mondeos as comedically terrible.
  • Cars just last longer these days, and they last longer because they are better. I think this explains it, to whatever extent "it" is real. Rust-proofing is better, engines are built better, and self-adjusting systems mean fewer mechanical failures - no longer written off by either catastrophic failures, or by many smaller failures leading to "that's it, I'm done with this fucking car" and an early trip to the scrapyard.
  • Cars have not improved so much between generations that buying a new car makes immediate practical sense, where it did in the past. For all I know a 2014 Fiesta might have real improvements over my 2004 one, but The Shed still starts every time I need it, and has a working heater. (It'd probably even have air conditioning, if I bothered to re-gas it.)
  • We have a different relationship to the cars of the past, for the above two reasons.
  • Or maybe, nostalgia ain't what it used to be; that, despite all the enormous technological changes of the last three decades upending basically everything, we feel closer to our immediate past than we did in 1990. Though it is an example from the United States, and one from 1973, American Graffiti stuck with me for two reasons. One is that dear God there is much to appreciate about this film but the attitude towards women makes that awkward to watch in The Current Year. But, the other is that it was a nostalgia trip about a very different, then-gone era...of eleven years before the film was made.

I don't know which of these is true, so I don't have a good conclusion to this piece. Oh no! Answers on a postcard. But I'll leave you with one last little snack for thought: the Bluesmobile was only six years old!

Cat, "it's that time of year" configuration

Guard Cat loves sunshine. She spent about five months almost entirely outdoors, coming inside for the occasional treat. It is now that time of year where the weather is cooling and the darkness rolls in earlier every day. My least favourite part of that is that it becomes unreasonable to wear sunglasses when I leave work. My favourite part of that is the soft slightly-fluffy cat who will become a mostly-indoor cat for the next few months. :)

The desk chair post, part 2

This was my desk chair.

I wrote about it before.

When I wrote about it before, I mentioned my concern that the much sturdier castors I fitted might end up breaking the no-metal-in-particular that cheap desk chairs swivel bases are made from. It broke a few months later.

Rather than fish another desk chair from a skip, I bought an entire swivel base assembly from Amazon for about £80. It turns out that not just the castors, but these entire assemblies are largely interchangeable between desk chairs. This thought had not occurred to me before! So, I did not have to "un-weld" the baseplate from the subframe as I had every previous time a swivel base had exploded on me. Just plop the old base plate and subframe on top of this...

...and my desk chair was fixed again. Simple!!

But, while I'm there...

Previously, I wrote:

I showed a photo of it to someone earlier today and they said "it needs arm rests". It doesn't need arm rests, but the fact someone thinks it needs arm rests means that it isn't the unquestioned best desk chair in the world.

It still did not have arm rests, so this time around I decided it was going to have arm rests. I had a pair of arm rests, salvaged from the previous donor chair.

Let's make some brackets! This time I bought (rather than salvaged) some steel for the purpose, for about £20. I still have some left over.

That turned into some smaller lengths of steel...

...which, via some dubious MIG welding and Jenolite satin black paint, turned into two slightly-wonky but almost presentable brackets for the arm rests.

Easy! (Just kidding, that took forever, because I am not all that good at this.)

As everything was dismantled (so that I could make a means to fix these brackets to the subframe), I figured I would give the subframe a cleanup and a coat of paint. It looked like this, resplendent in its original brown paint and marker pen assembly-guide scribbles from the first time I built it.

This subframe is an adapter plate between the car seat and the desk chair swivel base. It is almost always out of sight, so it didn't matter what it looked like. Still, I would never tidy it up it if I didn't do it now (the proof of this is that it has been unpainted for over a decade). This should have been just a coat of paint, but while I'm there...

...I was never very happy with those unfinished ends, either. They've never bitten me, and I've never seen them so I didn't mind them being ugly, but I always had the thought in my mind that they needed to be capped with something. This was as good a time as any to do it. So, some offcuts, some more dubious MIG welding, and some over-aggressive linishing to make the MIG welding look less dubious...

...and they look a bit better, if you don't really look at them. Which I won't! Because I'm sitting above them.

Still, the subframe that I never see now looks a lot more presentable. And when everything is bolted together...

...it has arm rests! Which was far more effort than it was actually worth, given that it never really needed arm rests. Especially when I came to use it and realised when setting the height for my arm rests I hadn't considered whether that height would allow it to fit under my desk...which meant chopping about 70mm out of the brackets the day after I assembled it all. But still, arm rests! And that, if nobody issues me some other challenge that makes me over-solve another problem that doesn't exist, should make it the unquestioned best desk chair in the world.

Let's play: "remove suspension bushes", on easy mode

This is a top link from the front suspension of a Rover P5.

This is part of the "rebuild the entire front end" subproject of my Rover P5 project. Among other things, I am replacing every suspension bush. That requires removing perished six-thousand-year-old rubber suspension bushes. This is nobody's favourite job, for any person that is lacking (say) a 12-ton hydraulic press.

I learned a little trick that makes it painless to remove suspension bushes. It uses tools and random junk which you probably already own if you have a car project.

First, identify the side of your suspension component that has more protruding bush than the other. We're going to call this side the receiving end.

If neither is an obvious candidate, then pick either one. It's not hugely important; it means marginally less effort to remove it.

Next, find a socket that fits fairly snugly over the bush on the receiving end. You should find one just large enough to accommodate the bush inside. The depth of the socket is not too critical.

In this case, a 32mm Metrinch socket was a perfect fit.

Next, find a bolt. It should be of the right diameter to fit through your socket. It should have sufficient length to go through the socket, your suspension component, and leave enough thread poking out the other end to accommodate a nut and a washer. 10 mm of "spare" thread (that's 3/8" if you're reading this in the United States or in 1965). Slide this and a protective washer through your socket.

I did not have a bolt of just the right size, but I did have a random length of somewhat-munted threaded rod which was of just the right size, so I used that instead.

Next, put a nut and washer on the other side of your bolt.

Ideally, the washer should be just a little smaller than the internal diameter of your component. It is sufficient to be just somewhat larger than the nut.

Next, put a spanner on the bolt head on the receiving end, then tighten the nut on the other end. You can do this by hand if you have to. I had other things I wanted to do that day, and I also have an impact wrench, so I went full send with an impact wrench.

This will extract the suspension bush into your receiving socket! ⭐ 🎵 IT'S A KIND OF MAGIC 🎵 ⭐

And the now-thoroughly-destroyed bush should quite easily pull out of your socket.

Do that another three times, then spend a couple of afternoons cleaning them up, and you'll end up with four spiffy-looking suspension top links...

...which do not have suspension bushes yet! Most people working on most project cars would be happy to fit polyurethane bushes from here. Polybushes are usually easy to fit without a press, so the next step would be straightforward and would not require a press. I would not want polybushes on the P5 even if such a thing existed for the P5; I want rubber bushes to keep the original characteristics of the car. I don't trust this same method to fit rubber suspension bushes (after all, I didn't care about destroying them when removing them), so this meant ordering that 12-ton press I mentioned. Oh well, I'm not convinced a press would have done the job any faster.

There are other field-expedient ways of removing bushes. You can burn them out with a blowtorch, but this stinks and takes forever. You can use a hole saw of exactly the right size. That stinks slightly less but also takes forever. This method is not just smell-free, but it is also very quick; it took about 20 minutes to find exactly the right combination of random bits of stuff in a box of shit and about 2 minutes in total to extract all four bushes. I hope this helps someone else.

The desk chair post

This is my desk chair.

It is a front seat from a 1990 Vauxhall Astra GTE, bolted to a subframe made from steel box section scavenged from some industrial shelving, welded to a swivel-chair base that I found in a skip. I've had some variant of it for over a decade, but I had cause to re-engineer it recently, so I am posting about it now. It's extremely comfortable! It is more supportive than any other chair I have used, including chairs that look like car seats, and including chairs that cost upwards of a grand.

There are two of these in existence! My brother was dismantling an Astra GTE that he purchased for an engine donor (MOT-failure GTEs were not worth much more than scrap weight back then, and that is a memory from the "painful to think about" department, next to the working two-door Range Rover I helped dismantle...). I got the seat for free on the condition that I made the other front seat into a desk chair for him as well. That other chair is still in use by a kid in the family as a gamer chair, and that makes me happy.

It has been rebuilt several times. This is because office swivel chairs are made of no material in particular, especially the cheap kind that gets thrown into a skip when it becomes too ugly to use. Usually this does not matter, because the sitting part of a swivel chair is also made of no material in particular, so the system in its entirety has plenty of flex. The Astra seat has a lot of extra weight, and there is no flex in the over-engineered subframe, so swivel chair bases tend to break.

This is what the subframe looks like.

It's not pretty, but you can't see it when you're sitting on it. If you look closely, you can see where I cut out a reinforcing section in the middle in the latest incarnation. This is in a probably-vain attempt to try and un-engineer a bit more rigidity out of the frame. I might try speed holes next.

I had a stroke of luck last time this broke a swivel-chair base. The base collapsed, and literally minutes later I saw my neighbour throwing a shitty-looking desk chair into a skip. I'll have some of that, thank you.

I can understand them throwing it out.

This time around, I decided to give the Astra seat a deep clean after reassembling the chair. I did not know how badly it needed one. This little thing is a game changer:

It's a brush attachment for a drill, which you can buy for about £15 on Amazon as part of a set. It demolishes baked-in cat fluff and everything else on a seat that a vacuum cleaner won't touch. I was impressed.

This is what a vacuum cleaner doesn't get out...

Everything mentioned so far, I acquired for free. This time around, I have got some improved castors for it, to replace the usual scratchy-sounding castors that you get on cheap desk chairs.

These have roller bearings, seem to be made of actual metal, and its wheels are made of a material not entirely unlike that of the small bouncy balls we had as kids that could be launched at the floor and which rebounded to the height of a four-storey building. They roll very nicely. They're also a lot stronger than flimsy desk chair castors. This isn't an unqualified good. See also what I wrote about the subframe earlier; they don't flex, which means they transfer forces elsewhere. That might cause the swivel base to break earlier than it would otherwise. We'll see!

You may have noticed that it does not have arm rests. You are not the first. I showed a photo of it to someone earlier today and they said "it needs arm rests". It doesn't need arm rests, but the fact someone thinks it needs arm rests means that it isn't the unquestioned best desk chair in the world. So maybe that is a project for another day...